Multiple Textures and Texture Units
You probably wondered why the sampler2D variable is a uniform if we didn't even assign it some value with GL.Uniform*. Using GL.Uniform1 we can actually assign a location value to the texture sampler so we can set multiple textures at once in a fragment shader. This location of a texture is more commonly known as a texture unit. The default texture unit for a texture is 0 which is the default active texture unit so we did not had to assign a location in the previous section; note that not all graphics drivers assign a default texture unit so the previous section might not've rendered for you.
The main purpose of texture units is to allow us to use more than 1 texture in our shaders. By assigning texture units to the samplers, we can bind to multiple textures at once as long as we activate the corresponding texture unit first. Just like GL.BindTexture we can activate texture units using GL.ActiveTexture passing in the texture unit we'd like to use:
GL.ActiveTexture(TextureUnit.Texture0); // activate the texture unit first before binding texture
GL.BindTexture(TextureTarget.Texture2D, texture);
After activating a texture unit, a subsequent GL.BindTexture call will bind that texture to the currently active texture unit. Texture unit Texture0 is always by default activated, so we didn't have to activate any texture units in the previous example when using GL.BindTexture.
OpenGL should have a at least a minimum of 16 texture units for you to use which you can activate using
Texture0throughTexture15.
We still however need to edit the fragment shader to accept another sampler. This should be relatively straightforward now:
#version 330 core

/* ... */

uniform sampler2D texture1;
uniform sampler2D texture2;

void main()
{
    FragColor = mix(texture(texture1, TexCoord), texture(texture2, TexCoord), 0.2);
}
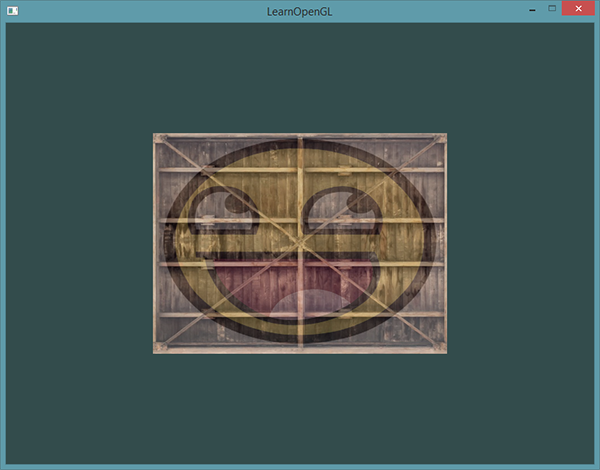
The final output color is now the combination of two texture lookups. GLSL's built-in mix function takes two values as input and linearly interpolates between them based on its third argument. If the third value is 0.0 it returns the first input; if it's 1.0 it returns the second input value. A value of 0.2 will return 80% of the first input color and 20% of the second input color, resulting in a mixture of both our textures.
We now want to load and create another texture; you should be familiar with the steps now. Make sure to create another texture object, load the image and generate the final texture using GL.TexImage2D. For the second texture we'll use an image of your facial expression while learning OpenGL:
To use the second texture (and the first texture) we'd have to change the rendering procedure a bit by binding both textures to the corresponding texture unit. Firstly, go to Texture.cs, and modify the Use function like so:
void Use(TextureUnit unit = TextureUnit.Texture0)
{
    GL.ActiveTexture(unit);
    GL.BindTexture(TextureTarget.Texture2D, Handle);
}
Then, add a new property to hold the new texture, and load it on OnLoad.
Texture texture2;

...

texture2 = new Texture("awesomeface.png");
The new texture is available, now we have to setup the shader uniforms. Add the following function to Shader.cs:
public void SetInt(string name, int value)
{
    int location = GL.GetUniformLocation(Handle, name);

    GL.Uniform1(location, value);
}
This function just simplifies the process of setting a shader's uniform. Samplers are represented as ints to the CPU; set the uniform to an int, and it'll check that texture unit.
Add the following lines just after the textures are created in OnLoad:
shader.SetInt("texture1", 0);
shader.SetInt("texture2", 1);
This sets the uniform texture1 to use whatever's in texture unit 0, and texture2 to use whatever's in texture unit 1.
Finally, modify OnRenderFrame to this:
GL.Clear(ClearBufferMask.ColorBufferBit);
GL.BindVertexArray(VertexArrayObject);

texture.Use(TextureUnit.Texture0);
texture2.Use(TextureUnit.Texture1);
shader.Use();

GL.DrawElements(PrimitiveType.Triangles, indices.Length, DrawElementsType.UnsignedInt, 0);

Context.SwapBuffers();

base.OnRenderFrame(e);
With both textures bound and the shaders setup properly, you should now see the following:
